
Introduction
In this tutorial, we will look at how you can install Apache2 on Ubuntu. Specifically, this guide applies to Vultr instances running Ubuntu 16.04, 18.04 LTS, 18.10, 20.04, and 22.04.
Prerequisites
Before you begin the installation, however, you must ensure you have the following:
- An Ubuntu instance (Versions 16.04, 18.04, 20.04, or 22.04 x64).
- Root access or a user with sudo privileges.
Consequently, if you meet these requirements, you can follow these straightforward steps to get your server up and running.
Step 1: Install Apache2 on Ubuntu
To begin, you must update your local package index to ensure you have access to the latest software versions. Therefore, run the following commands in your terminal:
sudo apt update
sudo apt upgradeNext, install the Apache web server package by running this command:
sudo apt install apache2Once the process finishes, you have successfully installed Apache2. Following this, you can verify that the service is running by checking its status:
sudo systemctl status apache2After you run the status command, your terminal will display the current state of the service. For instance, the example output below confirms that Apache is “active (running)” and has been operational for over an hour. In addition, the “enabled” status ensures that the web server will start automatically every time your system boots up. Finally, this overview provides essential technical details, such as the Main PID and memory usage, to verify that your server is healthy and responding.
● apache2.service - The Apache HTTP Server
   Loaded: loaded (/lib/systemd/system/apache2.service; enabled; vendor preset: enabled)
   Active: active (running) since Tue 2019-04-16 00:35:04 UTC; 1h 30min ago
  Process: 1376 ExecStop=/usr/sbin/apachectl stop (code=exited, status=0/SUCCESS)
  Process: 1381 ExecStart=/usr/sbin/apachectl start (code=exited, status=0/SUCCESS)
 Main PID: 1396 (apache2)
    Tasks: 11 (limit: 502)
   Memory: 84.1M
   CGroup: /system.slice/apache2.service
           ├─1396 /usr/sbin/apache2 -k start
           ├─2159 /usr/sbin/apache2 -k start
           ├─2160 /usr/sbin/apache2 -k start
           ├─2161 /usr/sbin/apache2 -k start
           ├─2162 /usr/sbin/apache2 -k start
           ├─2163 /usr/sbin/apache2 -k start
           ├─2164 /usr/sbin/apache2 -k start
           ├─2165 /usr/sbin/apache2 -k start
           ├─2166 /usr/sbin/apache2 -k start
           ├─2167 /usr/sbin/apache2 -k start
           └─2198 /usr/sbin/apache2 -k start

Apr 16 00:35:04 yourdomain.com systemd[1]: Starting The Apache HTTP Server...
Apr 16 00:35:04 yourdomain.com systemd[1]: Started The Apache HTTP Server.
Step 2: Manage the Apache Service
Now that the server is active, you might need to control it during your development process. For instance, you can manage the Apache service using these simple commands:
sudo systemctl stop apache2.service
sudo systemctl start apache2.service
sudo systemctl enable apache2.service
Please note that Ubuntu 22.04 uses the UFW firewall by default. Because the firewall blocks all incoming connections, you must manually allow web traffic.
Step 3: Configure the UFW Firewall
Additionally, if you are using Ubuntu 22.04, the “Uncomplicated Firewall” (UFW) is likely active. As a result, you must grant Apache access to the web ports. To open these ports, execute the following command:
sudo ufw allow in "Apache Full"Afterward, verify your firewall settings by running:
sudo ufw status verboseUltimately, your output should show that the firewall now allows traffic on ports 80 and 443.
Status: active
Logging: on (low)
Default: deny (incoming), allow (outgoing), disabled (routed)
New profiles: skip

To                         Action      From
--                         ------      ----
22                         ALLOW IN    Anywhere
80,443/tcp (Apache Full)   ALLOW IN    Anywhere
22 (v6)                    ALLOW IN    Anywhere (v6)
80,443/tcp (Apache Full (v6)) ALLOW IN    Anywhere (v6)
Step 4: Verify the Installation
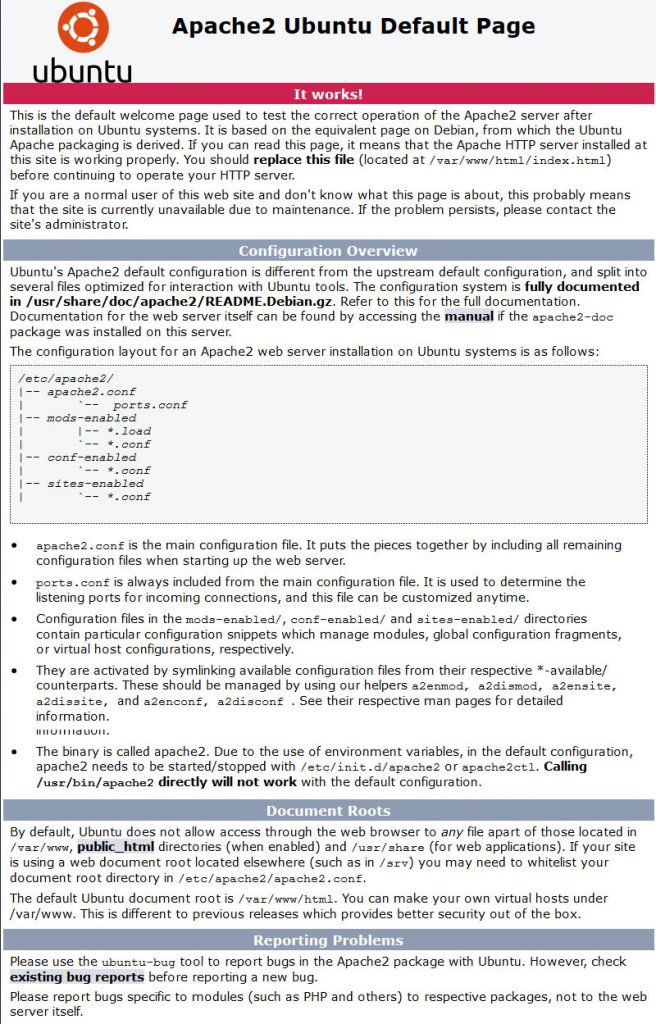
To confirm that everything works correctly, open your web browser. Then, type your domain name or server IP address into the address bar (e.g., http://YOUR_IP_OR_DOMAIN/). If the installation was successful, you will see the default Ubuntu Apache welcome page.
Understanding Apache’s File Structure
To manage your website effectively, you should understand where Apache stores its configuration files. Furthermore, following these best practices will keep your server organized:
- Main Configuration: The
/etc/apache2/apache2.conffile acts as the primary hub. It pulls all other configurations together. - Ports: The
/etc/apache2/ports.conffile determines which ports Apache listens to for incoming traffic. - Virtual Hosts: Store your individual site configurations in
/etc/apache2/sites-available/.- Pro Tip: Use a naming convention like
yourdomain.com.conf.
- Pro Tip: Use a naming convention like
- Enabling Sites: You must link files to
/etc/apache2/sites-enabled/to activate them. We recommend using the helper toolsa2ensiteanda2dissiteto manage these links easily. - Log Files: You can find your
access.loganderror.login the/var/log/apache2/directory. - Web Content: By default, Ubuntu serves files from
/var/www/html.
Conclusion
In summary, you have learned how to install and configure Apache2 on an Ubuntu server. By following this guide, you can now set up additional servers or start hosting your first website.
However, if you have questions or run into any issues, feel free to leave a comment below!